
Download the envelope template guide here!
Have you ever wanted to address an envelope in beautiful calligraphy... but it's super intimidating?
To me, the most scary thing about calligraphy envelopes (as a beginner and STILL to this day) is writing out everything in consistent, goof-free calligraphy, with no spelling errors, and getting it all centered perfectly. That shit is HARD!
I know this from experience. A few months after I had started my Instagram account, a local stationery shop reached out to me and asked for a portfolio of samples.
Well, of course I freaked out. There was NO WAY I felt confident enough to create a full calligraphy envelope. So I decided I would just write the name in calligraphy and add the address in left-justified block text.

The calligraphy on my first envelope is far from perfect. And I actually wrote the address using a black gel pen because I didn't trust myself to write block text with my nib.
But hey... it worked! I got hired to do an envelope job because this combination of calligraphy and sans serif text actually looks pretty elegant!
Here's how to do it!
Download and print the Envelope Guide Sheet so you have a template for your guidelines.
Then, if you haven't already, watch my Simple Calligraphy Envelope Video on YouTube to see my step-by-step process on how to create this simple style of envelope.
Some extra tips:
Envelopes: Make sure you're using nicer envelopes with a heavier paper weight (the one in the video is from Paper Source). If you get the cheapest envelopes you can find, your calligraphy ink might just feather and bleed into the paper.
Sketching: If you're really nervous about getting your name centered, you can sketch it in lightly with pencil first, get it just right, and then trace with your calligraphy pen!
Block Text: I know I make it look somewhat easy but this shit is TOUGH! If your nib is just not working for you, then just write the block text with a fine-tipped pen (like a micron or fine gel pen).
Starting Point: Use this lesson and layout as a starting point! This is just to get you comfortable with the idea of using your calligraphy on actual projects you can send to other people. There's TONS of inspiration and tutorials out there on different ways to address envelopes, specialty tools you can buy, etc. So, if you want to dive into the world of calligraphy envelopes, go get inspired and PRACTICE your heart out baby!
Happy Calligraphying!

WANNA IMPROVE YOUR CALLIGRAPHY?
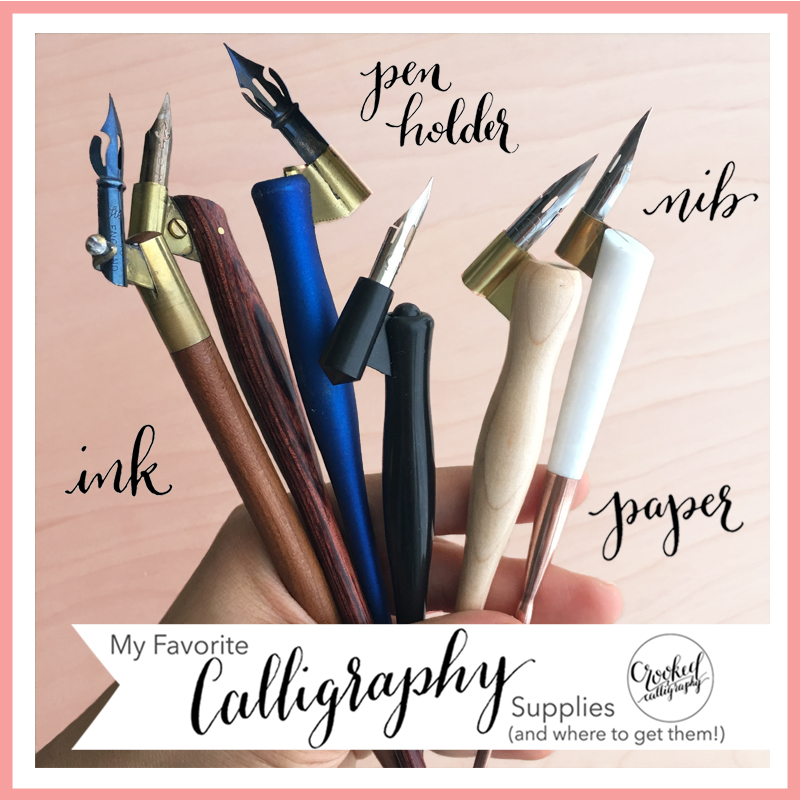
Well, first things first - make sure you're using the right tools! Don't waste your time and money buying the wrong shit!
Enter your info below to join my calligraphy learning email list - as a bonus, you'll get a FREE PDF of my favorite pens, nibs, inks and papers - with CLICKABLE LINKS - so you have all the info you need to get started right.
I'll send occasional, non-annoying emails with calligraphy tips, special offers and updates about my online courses!