![Ultimate Beginner's Guide to Pointed Pen Calligraphy [FREE WORKSHEET]](https://images.squarespace-cdn.com/content/v1/569683601115e0ac19d13d03/805f5cbf-6088-4e59-9719-2ce2080466d4/FullSizeRender+3.jpg)

If you’re reading this article, it means that calligraphy is calling to you.
You’ve seen it and you want to do it.
BUT!
Maybe you’ve watched an “intro to calligraphy” video and it shows you how to use a marker - not a calligraphy pen.
Or you’ve downloaded a “calligraphy tools” guide and there are a dozen different types of pens for you to choose from.
Or you went ahead and bought some tools - but goddamnit! - they’re just not working right.
Hey, I get it. I’ve taught calligraphy to THOUSANDS of students and the number one thing I hear from people who want to learn - “Where do I even start?”
And I get it on an even deeper level. ‘Cause I wasn’t always a curse-word-lovin’ calligrapher.
I used to be a corporate lawyer - completely stressed out, with NO time and NO brainpower to start a new creative hobby.
Even though I wanted to desperately.
So I’ve pared down my years of experience into this. A simple, straightforward, five-step guide to getting started.
So let’s dive right in, my friend!
Step 1: Don't waste time and money ordering the wrong tools!
Just because it says “calligraphy pen”, doesn’t mean it’ll create the kind of calligraphy you want.
There are different types of calligraphy nibs (broad-edge, round, monoline, etc.) and sooo many kinds of calligraphy inks.
This is where so many people GIVE UP on pointed-pen calligraphy.
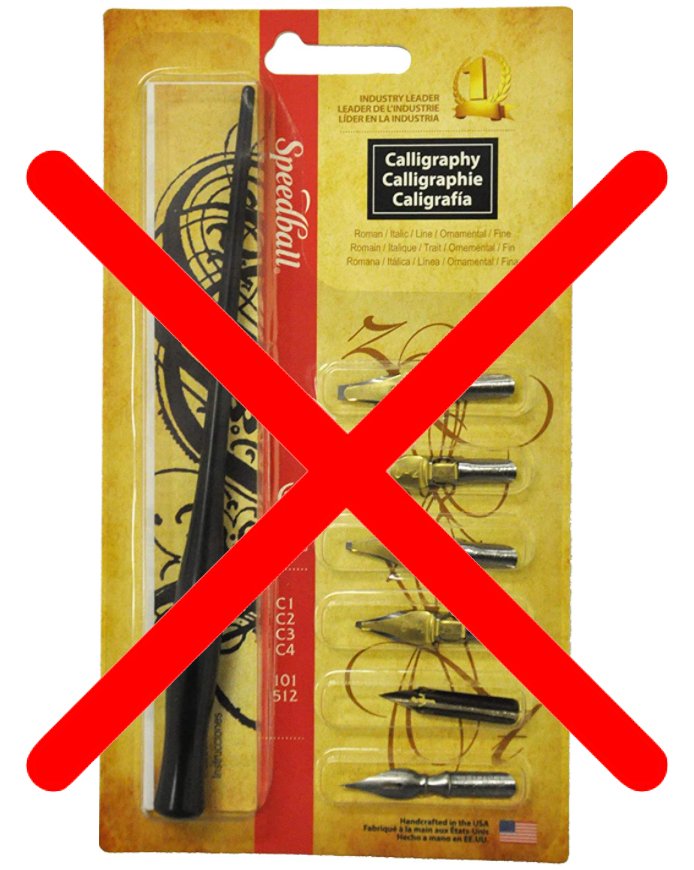
❌ So here’s what NOT to do. Don’t order the “Starter Kit” that you see in so many craft shops!
I did, and the tools are just not beginner-friendly.
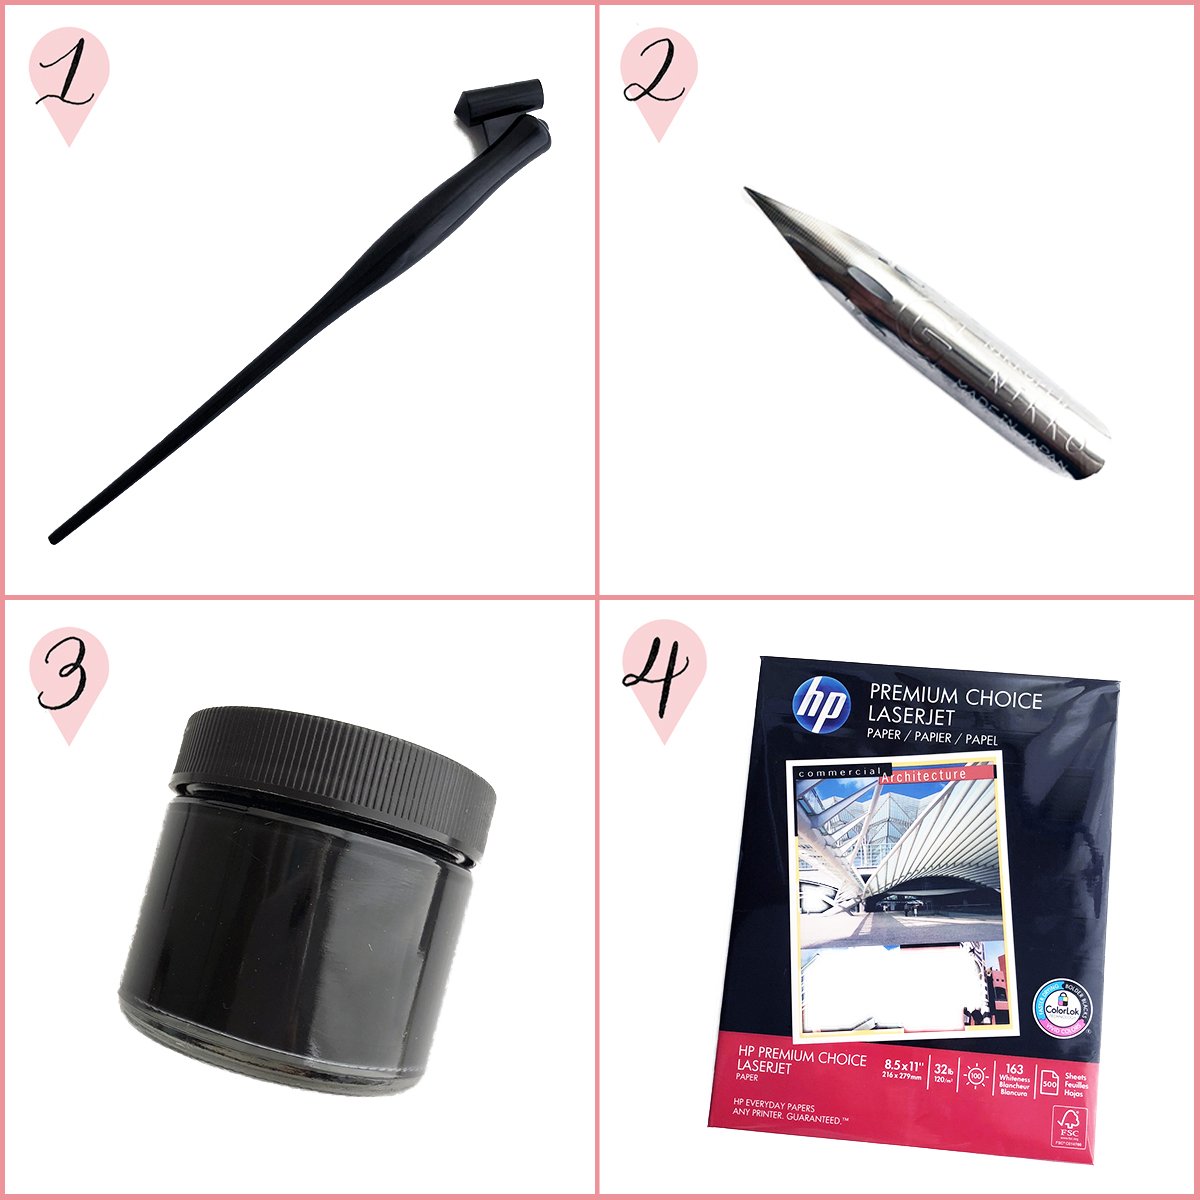
✅ Instead, order these FOUR simple tools:
*Affiliate links below
1. NIB HOLDER
Speedball Plastic Oblique - Inexpensive and widely available. Can function as both a left- and right-handed oblique holder.
2. POINTED NIB
Nikko G - Sturdy pointed flexible nib that’s not too sharp or fragile for beginners.
3. CALLIGRAPHY INK
Moon Palace Sumi Ink - works well straight out of the jar for most beginners. Pour the ink into a small lidded jar or container for easier dipping.
4. PAPER
Heavyweight (24-32 lb) Laser Jet Paper - my fav is HP Premium Choice Or, try Rhodia Pads or the highest gsm printer paper you can find at an office supply shop.
Step 2: Prep your tools properly
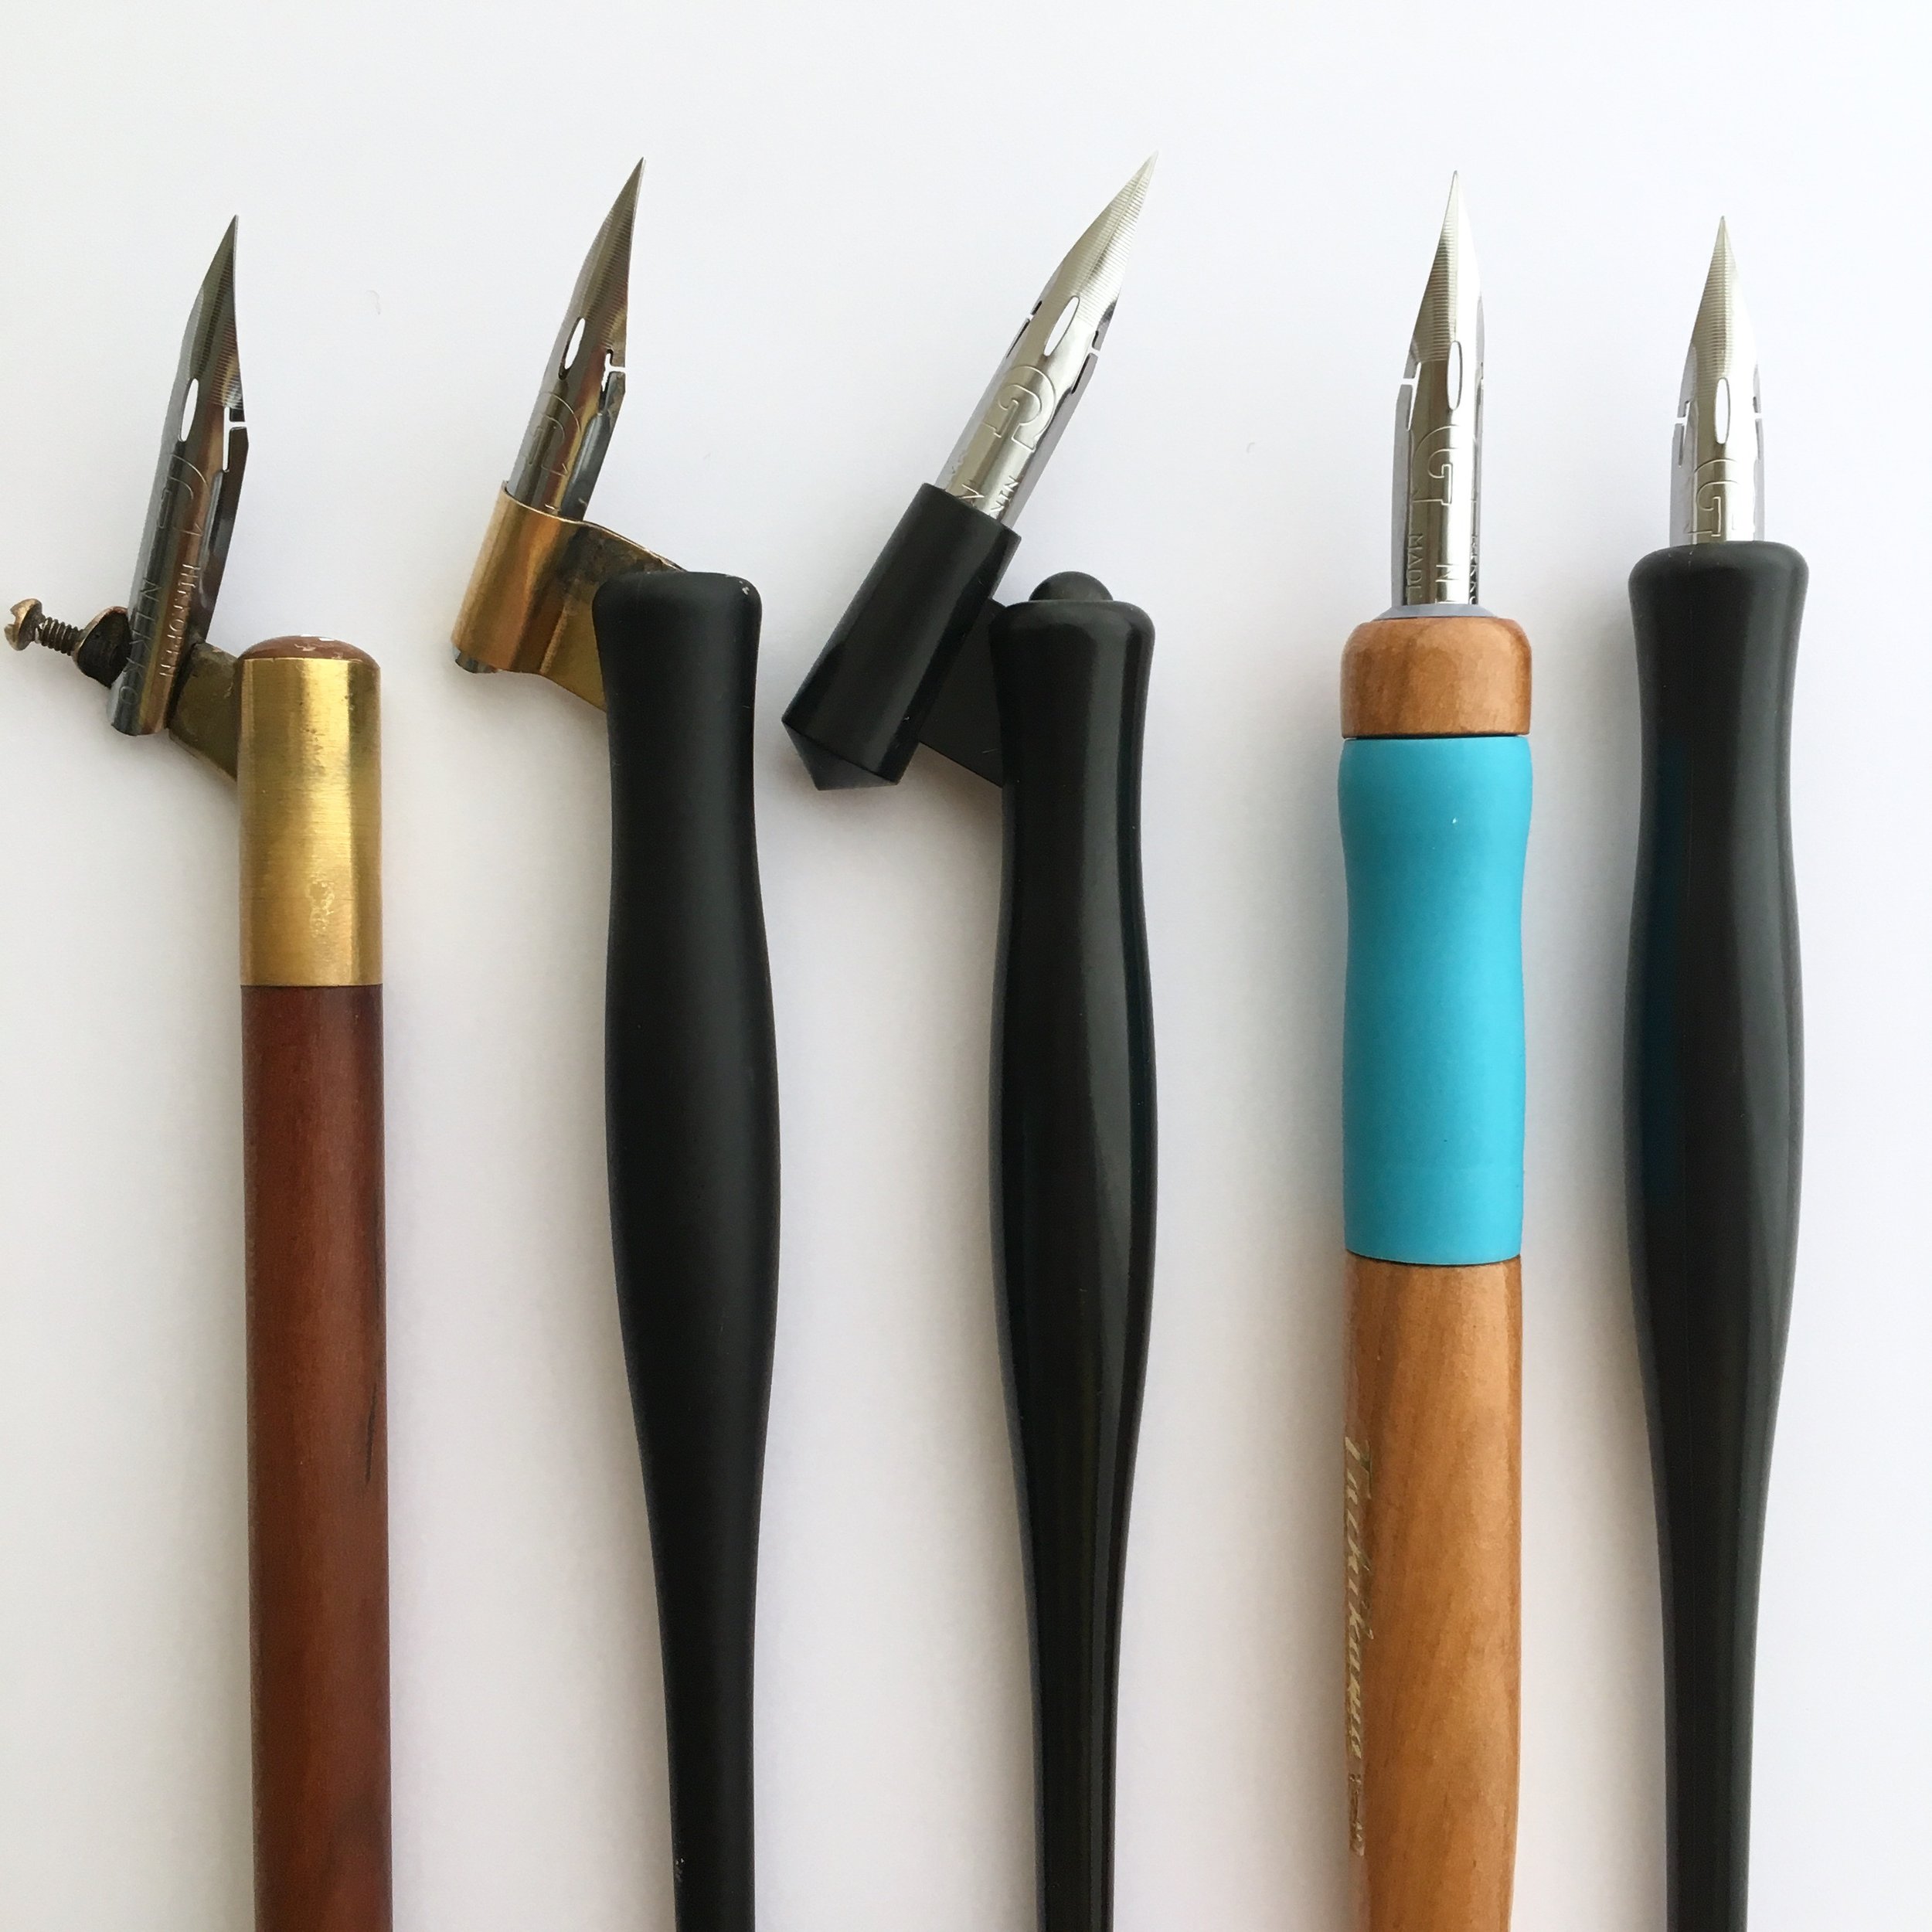
1. INSERT NIB INTO HOLDER
Here’s an image of the Nikko G nib inserted correctly into a number of different types of oblique and straight nib holders.
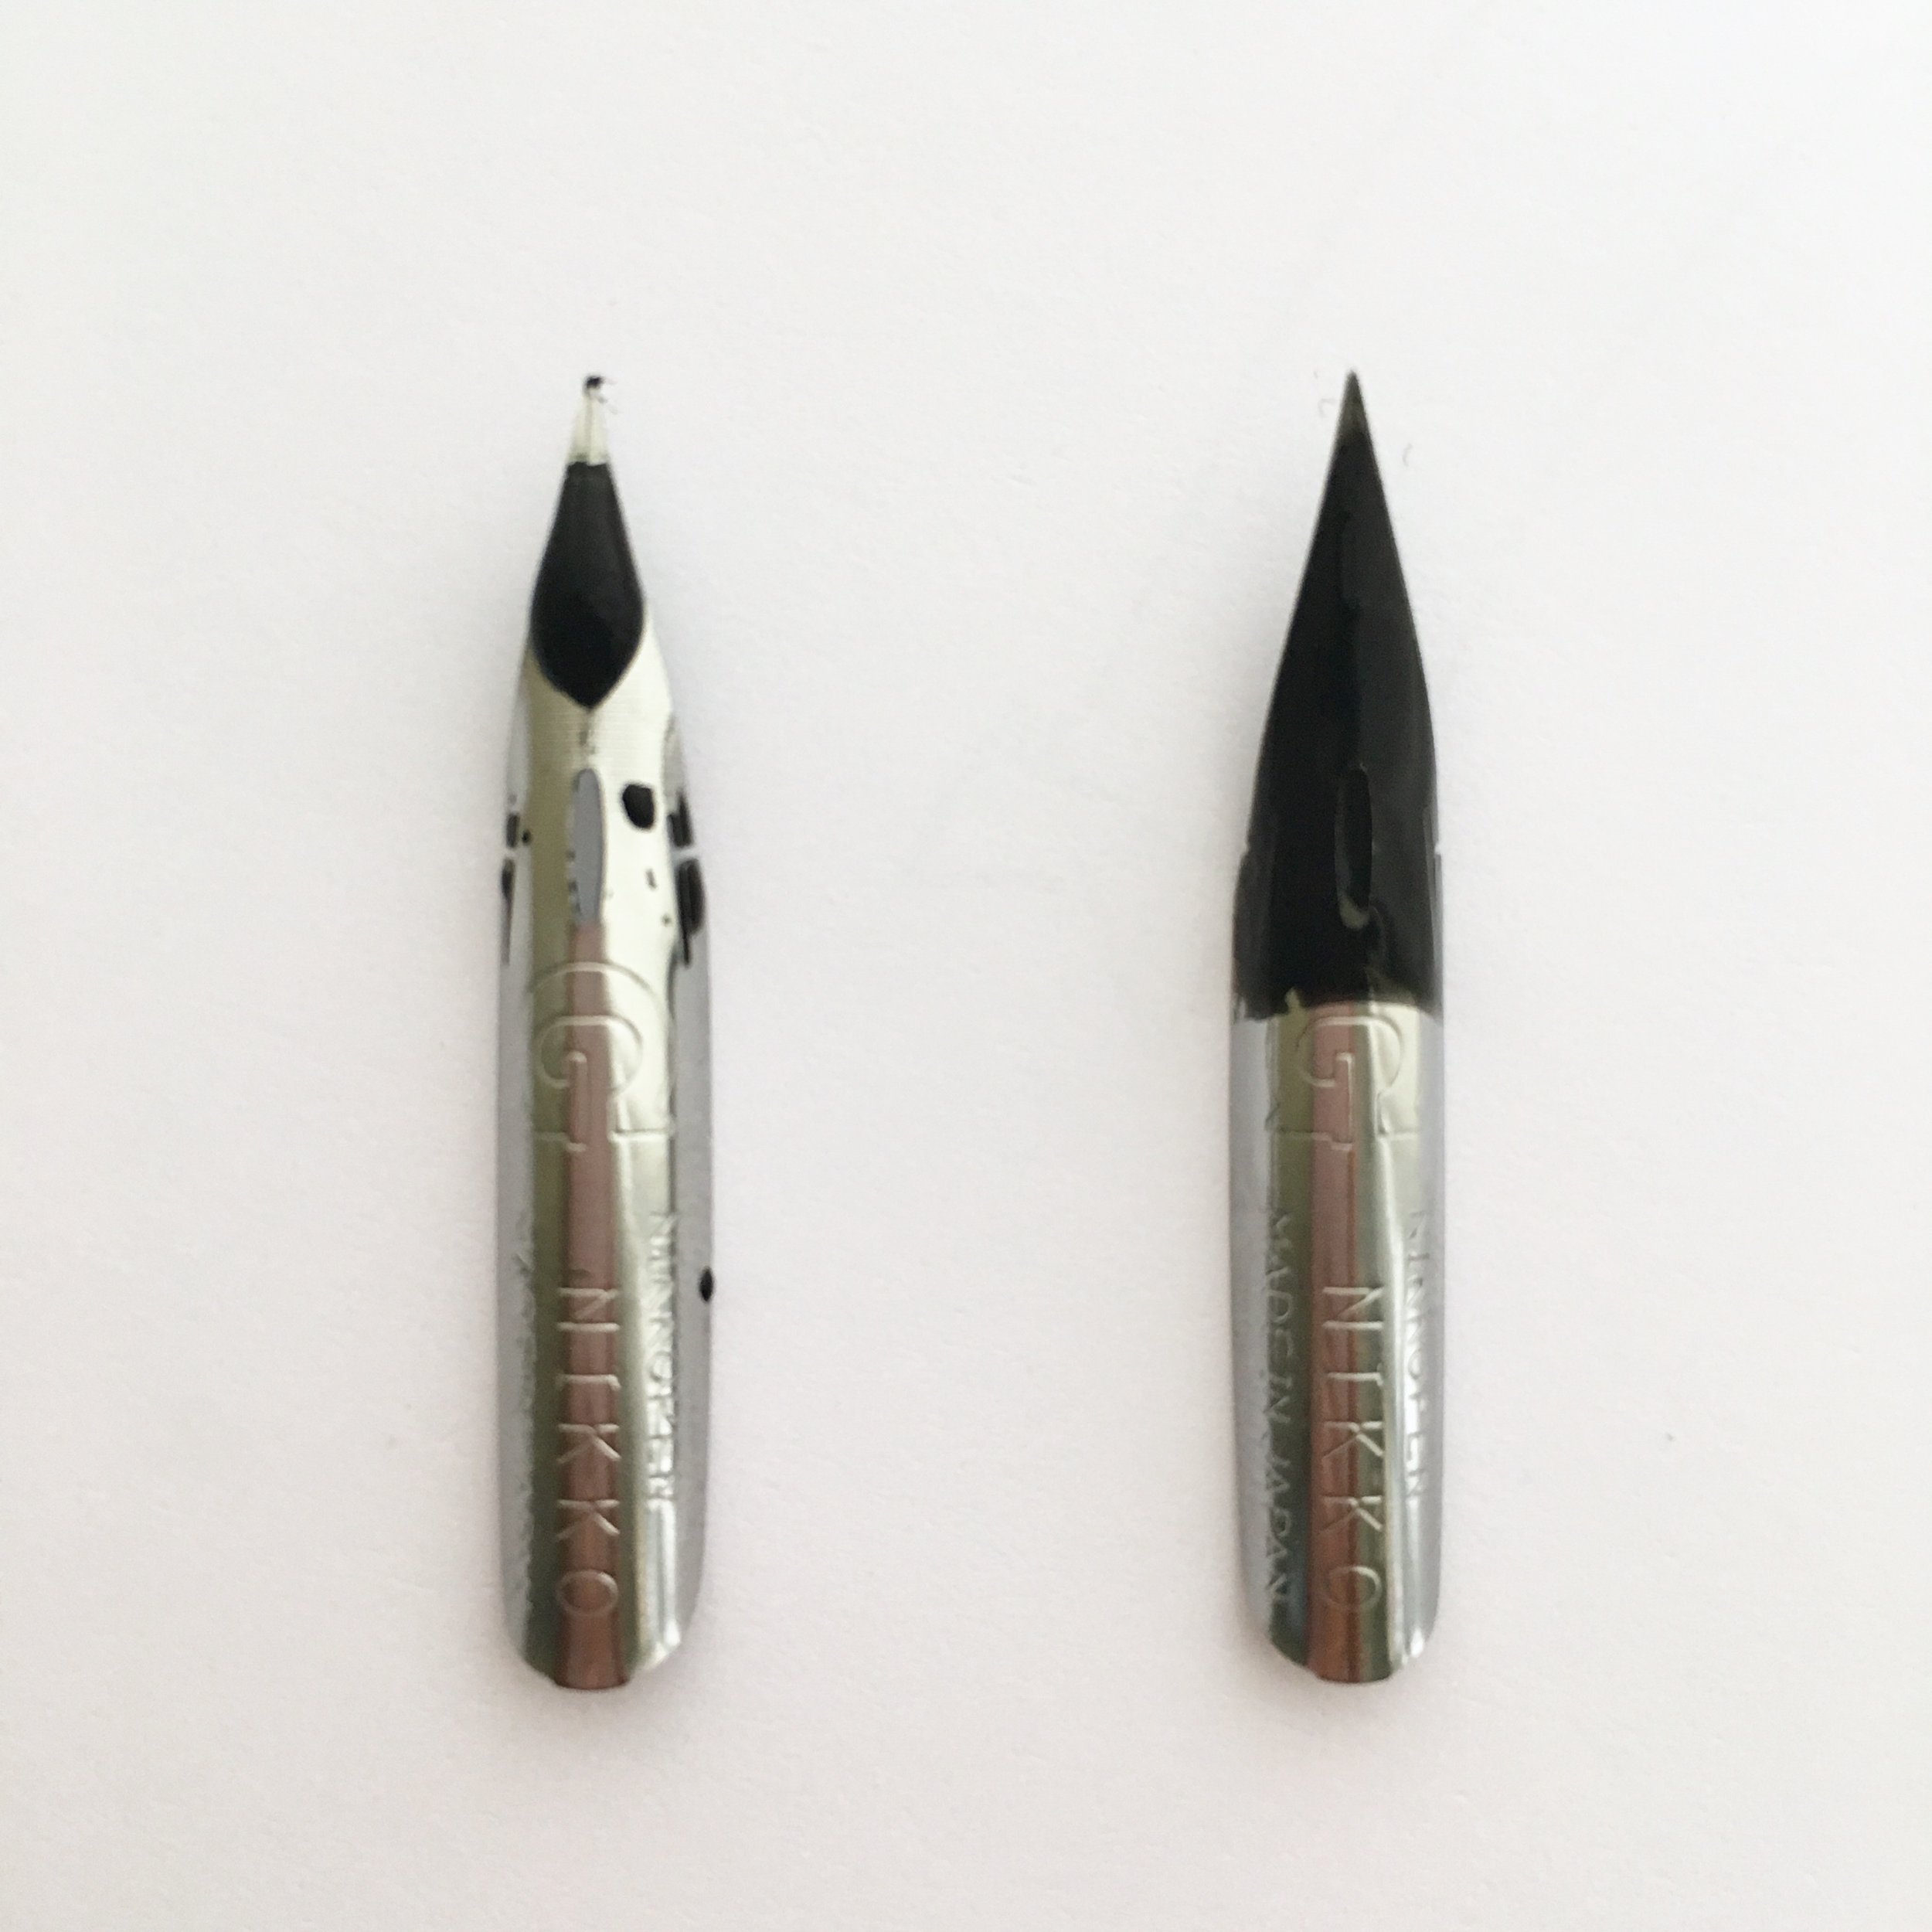
2. CLEAN YOUR NIB
Nibs come with a manufacturer’s coating that keeps them from rusting… and you need to clean that shiz off or your ink will NOT stick properly (see nib on the left). My favorite way to clean a new nib is to spit into a paper towel (sounds gross, but totally works) and wipe the nib until the ink coats it more evenly (like the nib on the right).
3. DIP INTO INK THE RIGHT WAY
The above photo also illustrates the proper way to dip into ink (yes, there’s a RIGHT and WRONG way to do this!).
You want to dip just past the oval hole in your nib. That way, your nib holds the optimum amount of ink.
Dip too little, and you’ll run out of ink really fast.
Dip too far in and you’ll have ink blobbing all over your page.
Step 3: Use my "A.R.S. Method" for perfect nib position
❗️This is super important: If you’re not holding your calligraphy pen the right away, then you can practice letters ALL. DAY. LONG. and they still will not look good.
Your lines will be shaky, you’ll get ink blobs, and your downstrokes will look raggedy and uneven.
So make sure your nib is in the right position by remembering three simple letters:
A is for Angle - Aim for your nib to hit your paper at a 45 degree angle. Too steep and your nib will be super scratchy. Too shallow and your ink will blob and you’ll get really thick hairlines.
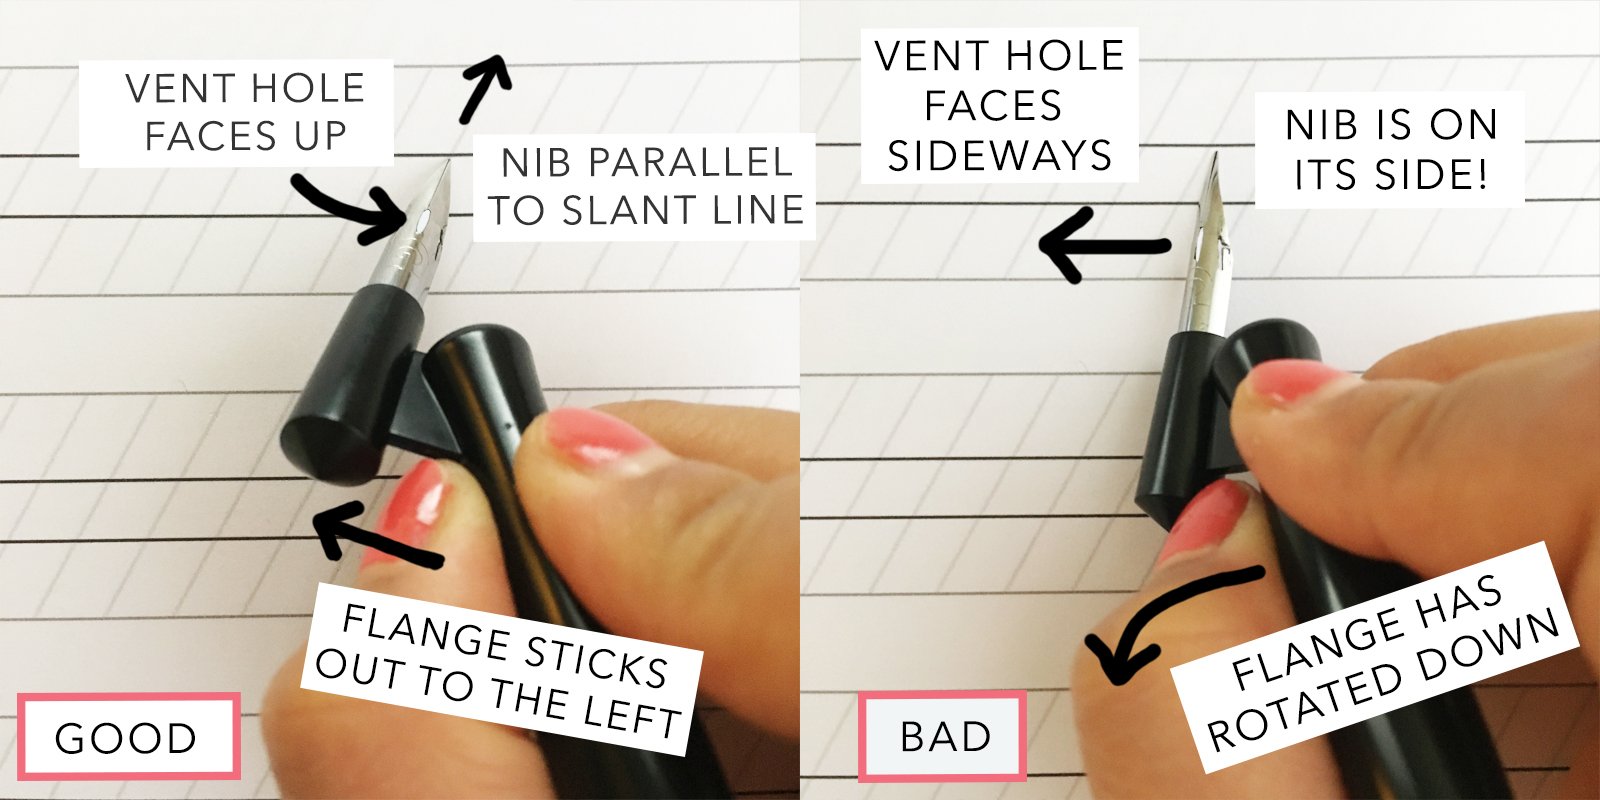
R is for Rotation - Your vent hole should face straight up to the ceiling, never to the side. When your nib is on its side, you’ll get scratchy, uneven lines
S is for Slant - Line up your nib so that it’s parallel to the slant line (Hint: rotate your PAPER to make this easier)
Step 4: Do some Practice Strokes
Ok, phew!
If you made if this far, you’re finally ready to draw some practice strokes using your inked nib.
Click below to get a FREE WORKSHEET and a VIDEO TUTORIAL walking you through each individual stroke 👇

Step 5: Do NOT give up too soon!
You know why most beginner calligraphers fail?
It’s not lack of proper tools or talent or artistry…
It’s that they give up too soon!
I made the exact same mistake!
I wanted to do calligraphy so I just googled “calligraphy pen” and bought the first thing that popped up…And it did NOT go well. It was nothing like the calligraphy I had seen all over social media.
🤦🏻♀️ So you know what I did? I GAVE UP ON IT! For MONTHS!
And I DON’T want that to happen to you.
Because when I finally came back to pointed-pen calligraphy, I was able to build a thriving business within a couple years. One that supports me and lets me work at home every day, in my stretchy pants, with my two little dogs. Occasionally, I stop work early and relax for the afternoon.
💁🏻♀️ I have a life that I could NEVER have imagined… especially when I was working 80-hr weeks as a corporate attorney.
And now it’s a reality. Because I found a creative skill that I LOVE and that people PAY ME for.
But it almost didn’t happen.
So I’m telling you from personal experience… don’t give up too soon!
Make sure to download my step-by-step tools guide, worksheet and video tutorial: 👇
www.startmoderncalligraphy.com
And if you have any questions, make sure to join my Instagram community (@CrookedCalligraphy) and message me directly over there! Over 110,000 calligraphy lovers agree it’s THE PLACE to go for guidance and inspiration!
Wishing you the best on your calligraphy journey!


WANNA KNOW THE EXACT TOOLS I USE?
Don't waste your time and money buying the wrong calligraphy shit!
Enter your info below to join my calligraphy learning email list - as a bonus, you'll get a FREE PDF of my favorite pens, nibs, inks and papers - with CLICKABLE LINKS - so you have all the info you need to get started right.
You’ll also get my weekly emails, filled with with calligraphy tips, freebies, and special deals for my online courses!
Other posts you might like! 👇


5 EASY steps to start pointed-pen calligraphy:
Order these FOUR simple, affordable tools
PREP your nib, holder & ink for success
Get the perfect NIB ANGLE
Practice some BASIC STROKES
Don’t give up too soon!
FREE WORKSHEET and VIDEO TUTORIAL included, so you can finally learn this beautiful craft!